
Ready to launch your startup in Pakistan but not sure where to begin legally? Let’s make it simple.
Registering your business with SECP is the first official step to going legit and it’s easier than you think in 2025. This quick guide walks you through the updated process, what documents you need, and how to get it done without the legal jargon or endless back-and-forth.
Let’s get your business off the ground the right way.
Step 1: Choose Your Business Type
Before you start the registration process, it’s important to determine what kind of company you want to form. Each type of business entity in Pakistan has different structural and legal requirements. The most common types include a Private Limited Company, Single Member Company (SMC), and Public Limited Company. Your choice affects how many directors or members you’ll need and how your company will be managed and regulated.
Below is a quick comparison to help you decide which type fits your business:
| Business Type | Minimum Members | Legal Requirement | Common Use Case |
| Private Limited Company | 2 Directors | Cannot invite the public to subscribe shares | Startups, SMEs, partnerships |
| Single Member Company | 1 Director | Only one member allowed; requires a nominee | Freelancers, solo founders |
| Public Limited Company | 3 Directors | Can raise funds from the public via shares | Large-scale businesses and corporations |
Once you’ve selected your business structure, you can move forward with the name reservation and incorporation steps. Choosing the right business structure is a pivotal decision; it lays the foundation for your company’s growth, operations, and long-term success, so take the time to choose wisely.
Step 2: Reserve Your Company Name
After choosing the type of company you want to register, the next step is to reserve a unique name for your business with the SECP. This name will represent your company legally, so it must follow certain rules and must not already be in use.
Here’s how the process works:
- Use the SECP’s online name search tool to check the availability of your desired company name. This helps you avoid using names that are already registered or restricted.
- Create an account on the SECP eServices portal. This is where you will carry out the entire online registration process.
- Start a name reservation application from within your eServices account. Fill in the required details, such as the proposed name, business activity, and company type.
- Pay the name reservation fee. This is typically Rs. 1000 for online payments and 2000 for offline payments.
- Wait for approval. If the name meets SECP’s criteria, you will receive a confirmation via email within 1 to 2 working days. If it is rejected, you will need to modify your application and resubmit.
- Once approved, the name is reserved for 90 days. During this time, you must complete the incorporation process to secure the name.
Make sure to follow the naming guidelines provided by SECP, such as avoiding prohibited words and ensuring the name aligns with your company’s business activities.
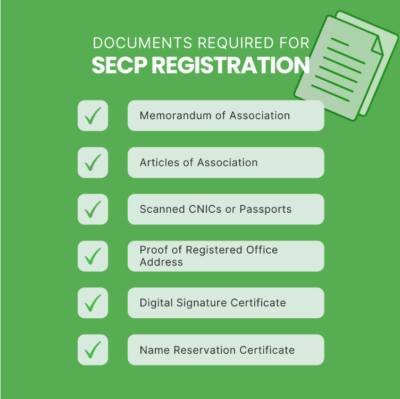
Step 3: Prepare and Submit Incorporation Documents
Once your company name is approved, it’s time to prepare and submit the incorporation documents through SECP’s eServices portal. These documents are essential to legally register your company, and accuracy is crucial to avoid delays or objections.
Here’s a step-by-step guide to what you need:
- Memorandum of Association (MoA)
Define your company’s objectives and business scope. SECP provides editable templates for different business categories. - Articles of Association (AoA)
Outlines internal governance rules, roles of directors, and management structure. You can use the standard template or modify it if needed. - Scanned CNICs or Passports
Required for all directors, shareholders, and company secretary (if applicable). - Proof of Registered Office Address
Provide supporting documents like a utility bill, rent agreement, or property tax slip with the official company address. - Digital Signature Certificate
Each director must get a digital signature from NIFT to e-sign documents on the SECP portal. - Name Reservation Certificate
It confirms that your chosen company name is approved and reserved by SECP. - Auto-Generated SECP Forms
Once you fill in your details on the portal, these forms are created automatically and must be digitally signed:
- Form 1 – Declaration of compliance
- Form 21 – Registered office address
- Form 29 – Details of directors, CEO, and secretary
- Form 1 – Declaration of compliance
Before uploading, double-check that all files are in PDF format and all information is consistent across documents to prevent delays.
Step 4: Pay the Incorporation Fee
Once all your documents are uploaded and verified, you’ll be required to pay the official incorporation fee. The amount depends on the authorized share capital of your company.
You can use SECP’s online Incorporation Fee Calculator to estimate your cost.
There are two ways to make the payment:
- Online Payment
After you submit your documents, the payment option will appear in your eServices account. You can pay using a credit or debit card. - Offline Payment
If you choose to pay offline, you’ll need to deposit the fee at a designated bank. The scanned copy of the deposit slip must be uploaded to your eServices portal before submission.
Don’t forget to keep a copy of the payment receipt, either printed or saved digitally. It will be required later when collecting your Certificate of Incorporation.
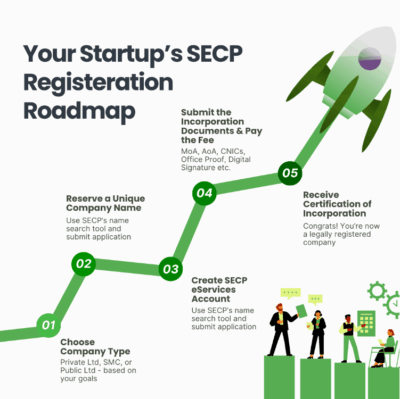
Step 5: Receive the Certificate of Incorporation
After successful submission and payment, SECP reviews your application. If everything is in order, the incorporation is usually completed within 5 to 7 working days.
If there are any objections or missing details, SECP will notify you via email. You’ll need to make the corrections and resubmit the relevant form through the e-services portal.
Once approved, you will receive an email confirming the incorporation along with your Company Registration Number (CRN).
You can either:
- Download the Certificate of Incorporation from your eServices account, or
- Collect it from the concerned Company Registration Office (CRO), using your payment receipt
This certificate officially recognizes your company as a registered legal entity in Pakistan.
Step 6: Post-Registration Procedures
After your company is registered with SECP, a few formalities remain before you can begin operations. These steps ensure your business is fully compliant with tax and legal requirements.
Here’s what to do next:
- Apply for a National Tax Number (NTN)
Every company must have an NTN from the Federal Board of Revenue (FBR). You can apply through the FBR’s IRIS portal. This number is essential for tax filings and other financial activities. You’ll need scanned copies of your incorporation documents and CNICs to complete this process. - Register for Sales Tax (if applicable)
If your company deals with taxable goods or services, you’ll also need to register for sales tax with FBR via the same portal. - Open a Business Bank Account
Once you have your NTN, you can open a business bank account in your company’s name. This is required for managing official transactions and finances. - Register with PSEB (for IT/ITES companies)
If your company operates in the IT sector, it’s beneficial to register with the Pakistan Software Export Board (PSEB) to access incentives and tax benefits.
Congratulations on successfully completing the registration process. You’ve taken an important step towards building your business. We’re here to guide you every step of the way. Best of luck with your new venture.